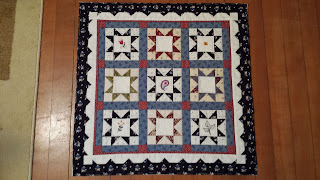
I thought that I would share with you a couple projects that I am working on right now. I just finished sewing a casing to a throw that I had made a while back as a shop sample. Hubby wanted to hang it at the office at work. So now that is ready.
I am busy putting the binding on a wall hanging that I made for a guild and club challenge. Since my time was limited at the time, I decided to combine the challenges and that way I only had to make one. For the guild we needed to use 1 1/2" strips in our challenge that were given to us at the Christmas meeting. For the club challenge, we needed to use the navy reproduction print in our quilt. I was fortunate enough to have reproduction 1 1/2" strips in my roll, so I thought it would work out perfectly with the navy reproduction fabric.
I love stars, especially the evening star pattern. I decided to make 4" finished stars using the 1 1/2" strips for the star points and some for the backgrounds of the stars. The navy fabric I used for the rest of the stars and border and binding. I used the same cream fabric for the centers, but I embroidered little designs in the center of the navy stars. I used my embroidery machine also for the quilting designs in the centers of the other stars. Unfortunately, I was not able to finish it by the meeting, but I am very happy with it.
While I had my embroidery machine ready, I thought that I would embroider a design that I am going to use in the center of another wall hanging. This is the embroidery:
Interesting that while I was working on my projects the birds were really singing outside my window. Here is one of my feathered friends!
Happy Sewing,
Jean
Tuesday, November 5, 2013
Monday, November 4, 2013
Ironing Board
I decided that I could make better use of my space by making my own ironing board that would fit on top of one of my shelf units. I wanted something firmer than a regular ironing board for better pressing.
I bought a piece of wood 16" x 36". I believe it was roughly 1/2" thick, possibly 3/4". I took 2 layers of cotton batting (about 2" larger on each side), and wrapped it around the top of the board to the back. Most directions that I found online used staples to fasten it, but since I didn't have any, I thought I would be creative and use some pink duct tape that my hubby bought for me. It worked perfectly for the job!
Next I chose a piece of fabric that I would like for the cover. I knew that I would like a neutral print since I was a little worried about colors on some prints possibly rubbing off on whatever I would be pressing. I was a little limited since I really collect a lot of fat quarters rather than yardage. I found the perfect piece with enough yardage, with some to spare. I wrapped the fabric around the board tautly and folded the edge of the fabric in at the end and overlapped the beginning of the fabric where I had started from. Clear as mud?! That way I had no raw edges. Now since I had no staples, I decided to use my quilt basting safety pins to fasten the edge of the back in place. I actually laid awake the night before planning how I would do this! I brought the sides around to the back and pinned them in place too.
Voila! A wonderful new ironing surface that fits perfectly on the top of my shelf! And I used what I had on hand except for the board!
Happy Sewing,
Jean
Subscribe to:
Comments (Atom)


